
How to Set Up the Votifier Plugin on a Minecraft Server
Articles
← BackDo you want to attract new players to your Minecraft server? The most effective way is through server lists – websites where players vote for their favourite servers, and the servers with the most votes appear at the top. To give players a reason to vote, it is common to reward them in-game for every vote. That is exactly what the NuVotifier and VotingPlugin plugins do together. In this guide we will go through the whole setup from scratch: allocating a port in the Game panel, installing the plugins, connecting the three most used Czech and Slovak server lists, and setting up rewards.
How voting works
When a player clicks “Vote” on a server list, the website sends a short message to your server: player XY has just voted. This message is received by the NuVotifier plugin. It listens on a separate network port (different from the one players connect to) and verifies that the message really comes from that server list. NuVotifier itself does not hand out any rewards – it only passes the vote on. The reward is handled by a second plugin, in our case VotingPlugin, which gives the player a diamond, in-game money or a crate key, for example.
A server list therefore needs to know three things about your server:
- Server address – at Wespner this is your subdomain, the one players use to connect (in this guide
wespner.mcplay.cz), always without the port. - Votifier port – a separate port on which NuVotifier receives votes. It must not be the same as the game port.
- Token or public key – a “password” the server list uses to prove that the vote really comes from it. NuVotifier generates it on first start.
Before you begin, make sure you have:
- A Minecraft server at Wespner with plugin support – that is Paper or one of its forks (for example Purpur). Plugins do not work on a plain Vanilla server or on Forge and Fabric servers.
- Access to the Game panel at game.wespner.eu.
- An account and your server added on the server lists where you want to enable voting.
If you run a network of servers behind a proxy (Velocity or BungeeCord), NuVotifier is also installed on the proxy and votes are forwarded from there to the individual servers. That setup is described in the official NuVotifier documentation. This guide covers a single standalone server.
1. Allocating a port for Votifier
Every game server gets a main (primary) port from us, which players use to connect. For Votifier you need another, separate port. In the Game panel, ports are called allocations.
- Log in to the Game panel at game.wespner.eu and open your server.
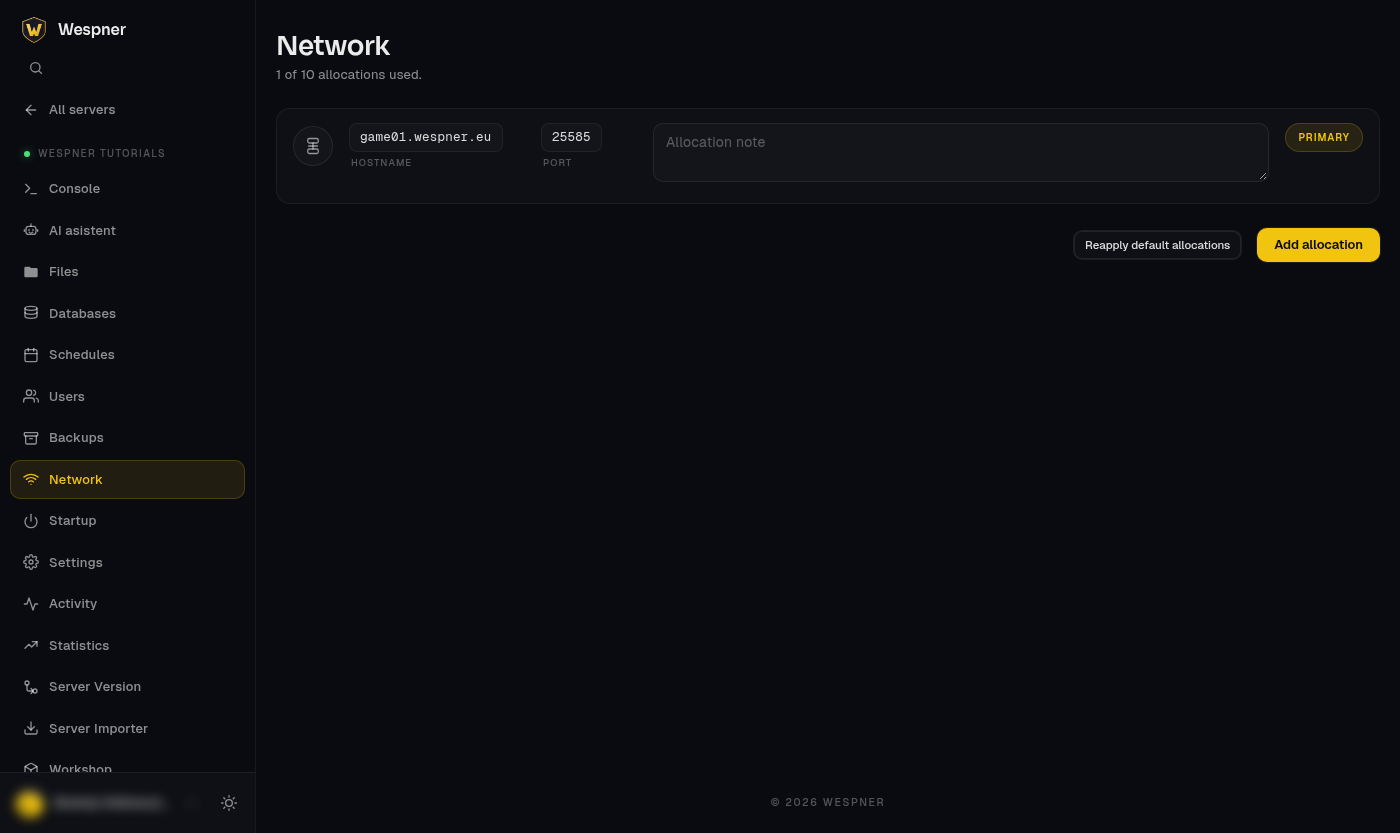
- Go to the “Network” tab. You will see the list of allocations. Our tutorial server has only one so far – the primary one (marked “Primary”) with port 25585, which players connect to.
- Click the yellow “Add allocation” button. The panel adds a new row with another port – in our case 25936. You do not choose the number yourself, the panel assigns it, and it will be different on your server.
- In the “Allocation note” field next to the new port, type something like “Votifier” so you know later what the port is for. The note is saved automatically as soon as you click outside the field.
- As the server address you will enter your subdomain on the server lists (in this guide
wespner.mcplay.cz). You can find it on the “Console” page in the “Address” card or in the “Subdomains” tab, where you can also create it.
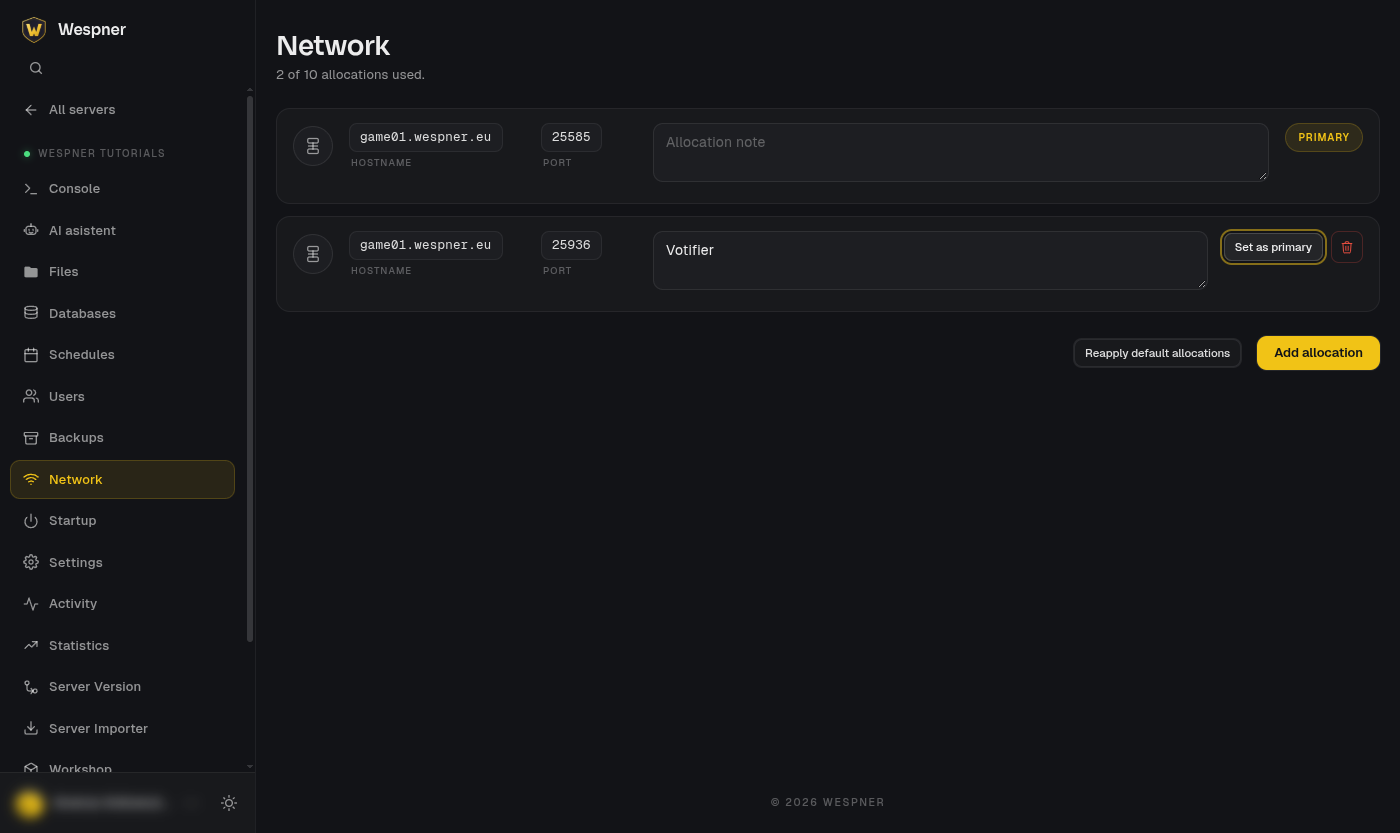
Above the list you can see how many allocations you have available (in our case “2 of 10 allocations used”). If the button for adding an allocation is missing, you have used up the port limit of your plan – contact our support and we will add a port for you. Unlike a VPS, there is no firewall to configure here: the allocated port is reachable from the internet automatically.
In the following steps we will work with these values (yours will differ): server address wespner.mcplay.cz, game port 25585 and Votifier port 25936.
2. Installing the plugins
Download both plugins (files with the .jar extension):
- NuVotifier – receives votes. The universal version works on Paper, Purpur and Spigot.
- VotingPlugin – hands out rewards and gives players the
/votecommand with voting links.
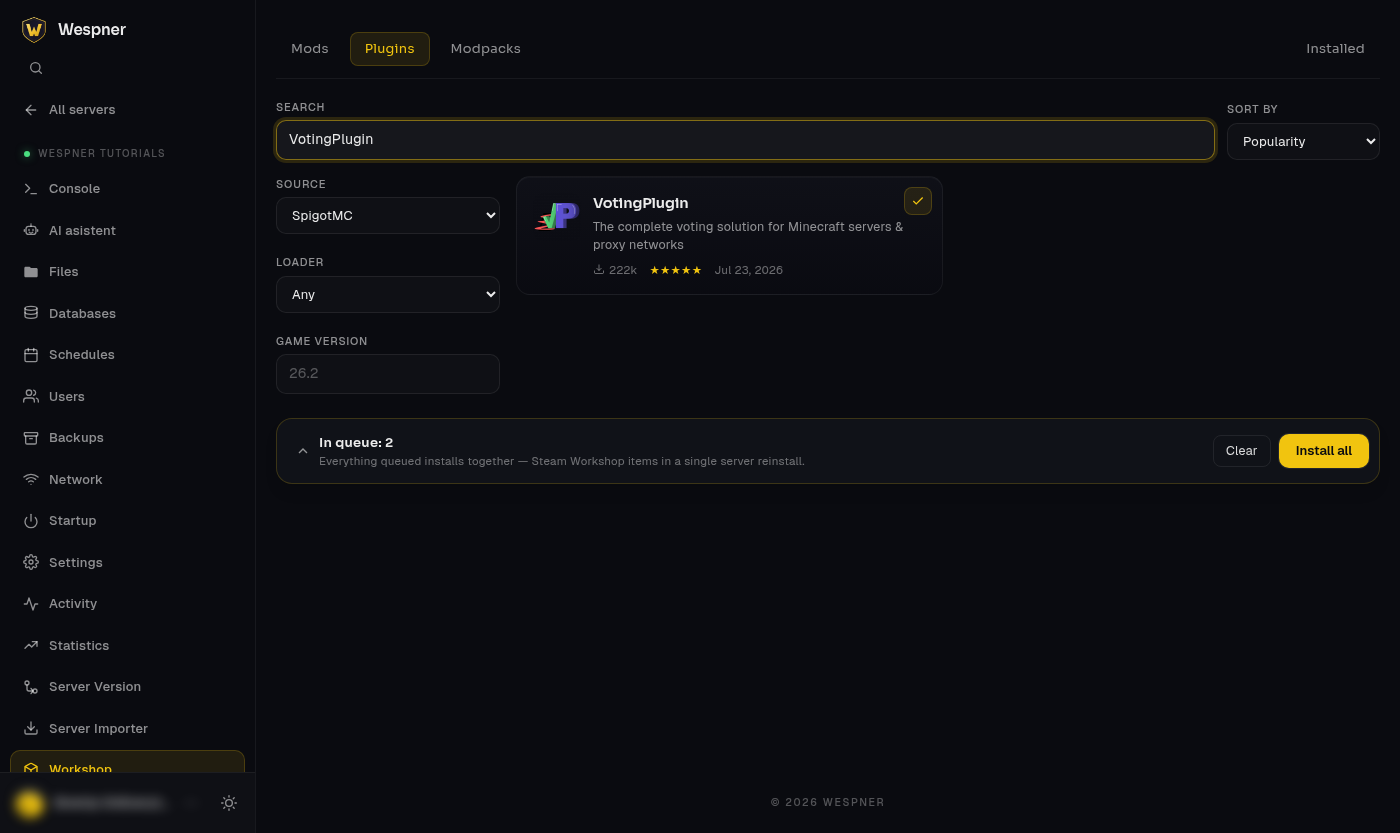
The most convenient way is our “Workshop” tab in the Game panel: switch to “Plugins”, choose SpigotMC as the “Source”, search for “NuVotifier” and click the “+” icon (Add to queue) next to the plugin. Search for and add “VotingPlugin” the same way, then click “Install all” in the bar at the bottom. The Workshop downloads both plugins into the plugins folder for you and keeps them updated automatically, so you do not have to download them from SpigotMC by hand.
If you want to upload the files downloaded from SpigotMC manually:
- In the Game panel, open the “Files” tab and enter the
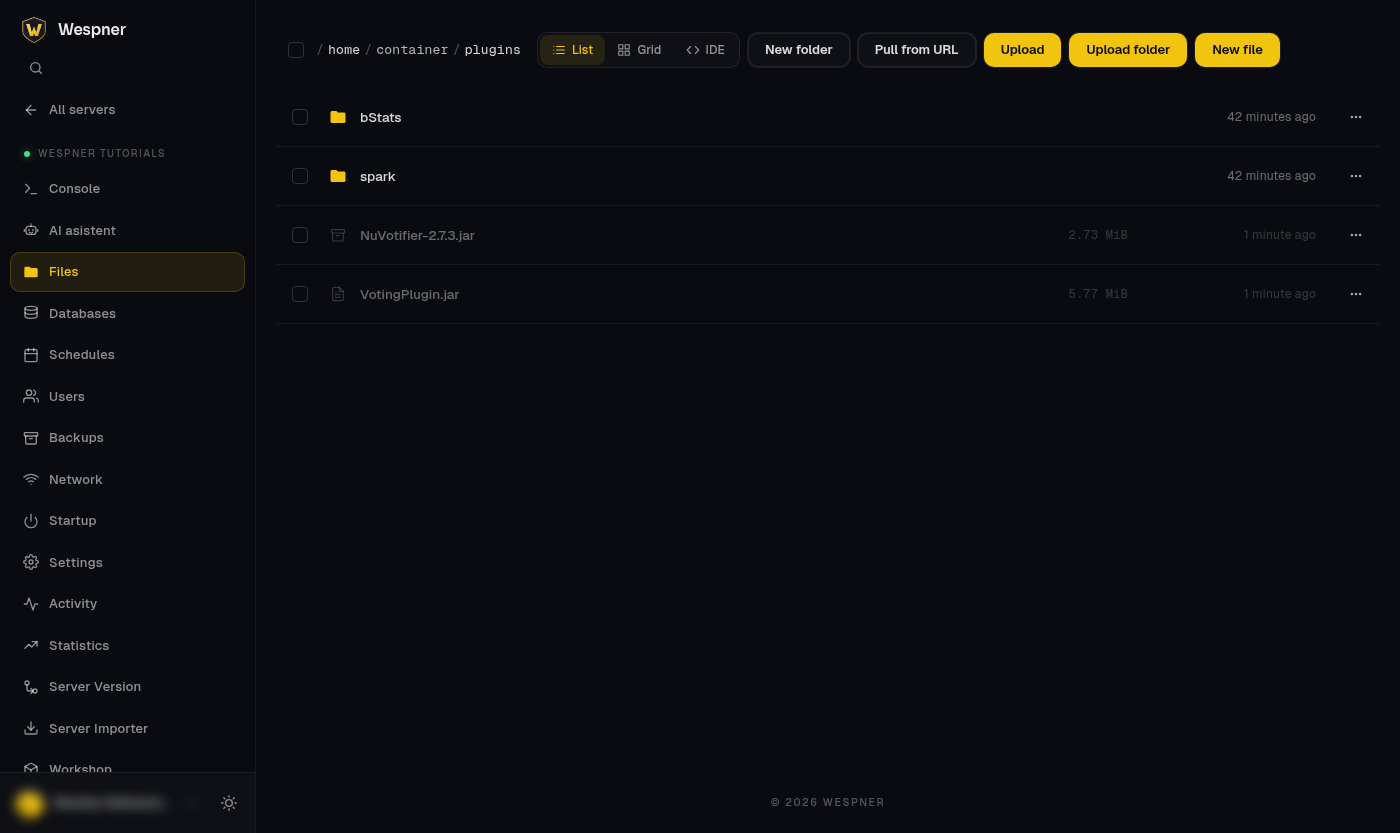
pluginsfolder. - Click the yellow “Upload” button and select both downloaded files (or drag and drop them into the window). If you only have a download link, you can use the “Pull from URL” button, paste the link and the panel downloads the file for you.
- If you prefer SFTP, you will find the login details in the “Settings” tab. Upload the files into the same
pluginsfolder.
After the upload, both files appear in the listing:
Then go to the “Console” tab and restart the server with the “Restart” button in the top right. On startup, both plugins create their folders with configuration files.
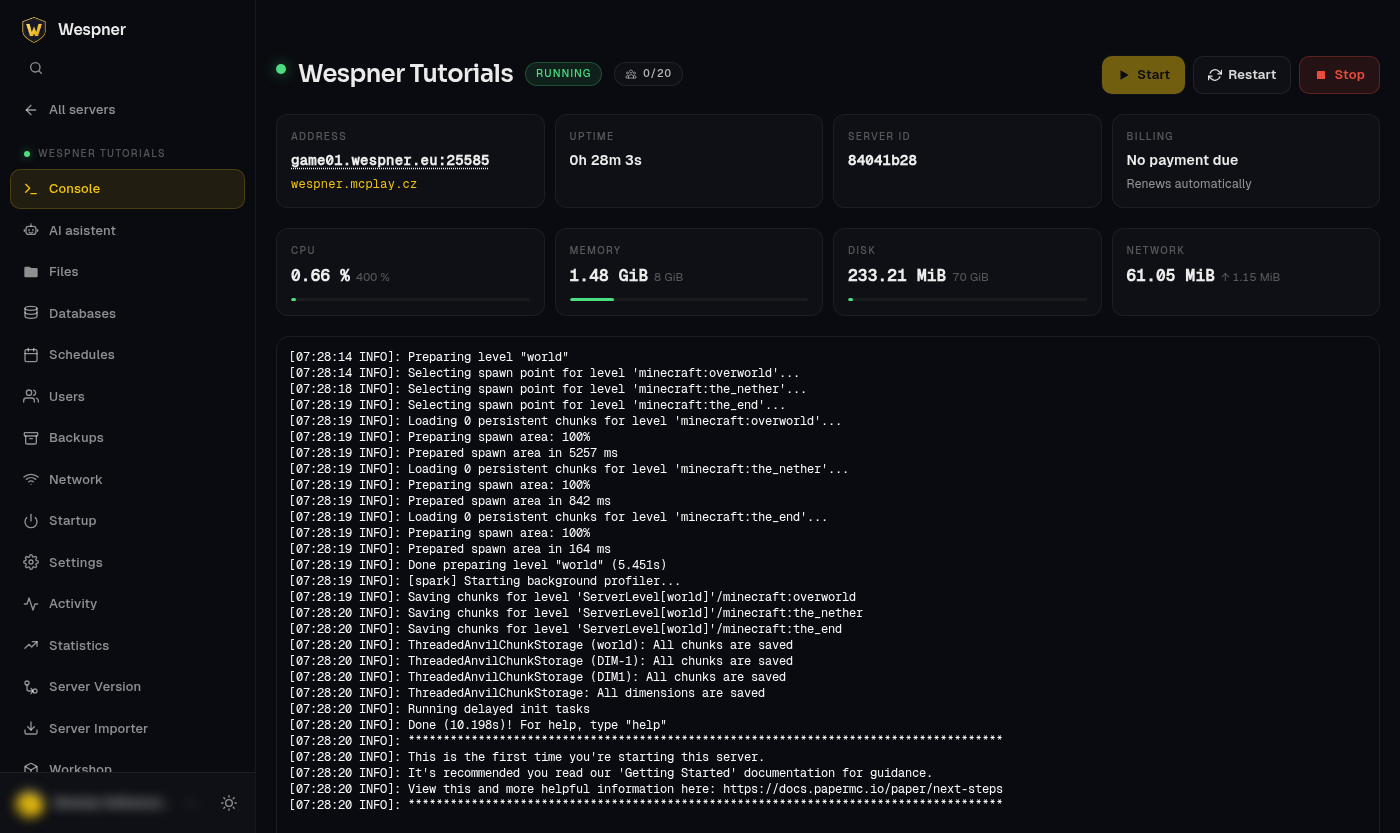
After the restart, watch the console output. On its first start, NuVotifier prints lines that also contain your token:
[Votifier] Configuring Votifier for the first time...
[Votifier] Assigning NuVotifier to listen on port 8192. If you are hosting Craftbukkit on a
[Votifier] shared server please check with your hosting provider to verify that this port
[Votifier] is available for your use. Chances are that your hosting provider will assign
[Votifier] a different port, which you need to specify in config.yml
[Votifier] Your default NuVotifier token is xxxxxxxxxxxxxxxxxxxxxxxxxx.
[Votifier] You will need to provide this token when you submit your server to a voting
[Votifier] list.
[Votifier] Votifier enabled on socket /[0:0:0:0:0:0:0:0%0]:8192.
Port 8192 is the default; in the next step we will change it to the port allocated in the Game panel. Also note that NuVotifier named its folder Votifier, not NuVotifier – this is for backward compatibility and is perfectly fine.
NuVotifier prints this block with the token only on the very first start. You do not need to copy it from the console – the same token is in the config.yml file, which we will open in the next step.
3. Configuring NuVotifier
In the “Files” tab, open the plugins/Votifier folder and click the config.yml file – it opens directly in the panel's editor. The file looks roughly like this (comments omitted for clarity):
host: 0.0.0.0
port: 8192
disable-v1-protocol: false
tokens:
  default: xxxxxxxxxxxxxxxxxxxxxxxxxx
forwarding:
  method: none
What the individual entries mean:
host– the address NuVotifier should listen on. Keep0.0.0.0, which means “on all addresses”. If there is a specific IP address here, change it to0.0.0.0.port– the only entry you have to change. Replace 8192 with the number of the port you obtained in step 1. In our caseport: 25936.disable-v1-protocol– keepfalse. Some server lists still use the older public-key verification, and withtruethe server would reject their votes.tokens– this is your token. Do not change it; you will copy it to the server lists.forwarding– only relevant for networks behind a proxy; on a standalone server keepnone.
After the edit our file looks like this – line 6 has the new port 25936 and line 16 the token:
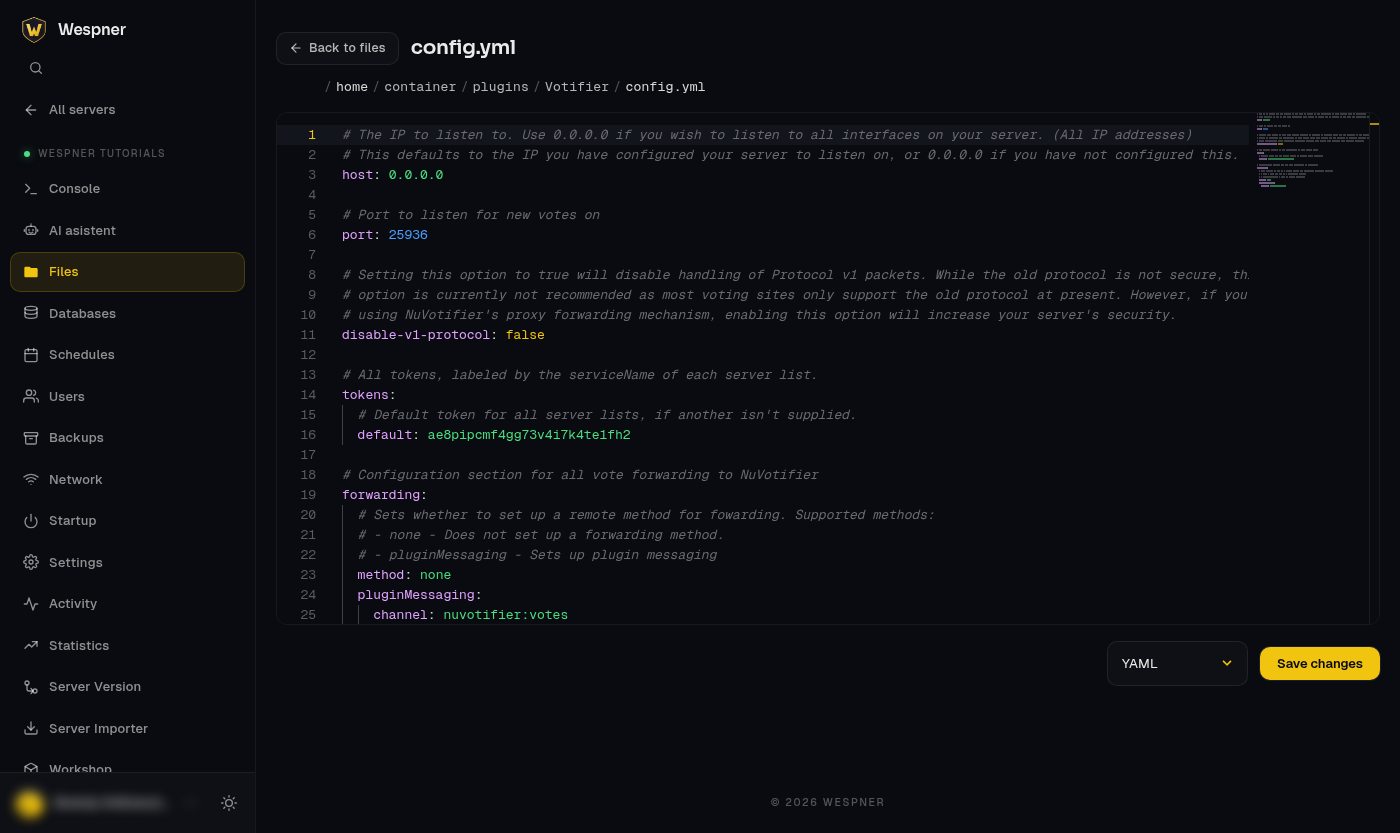
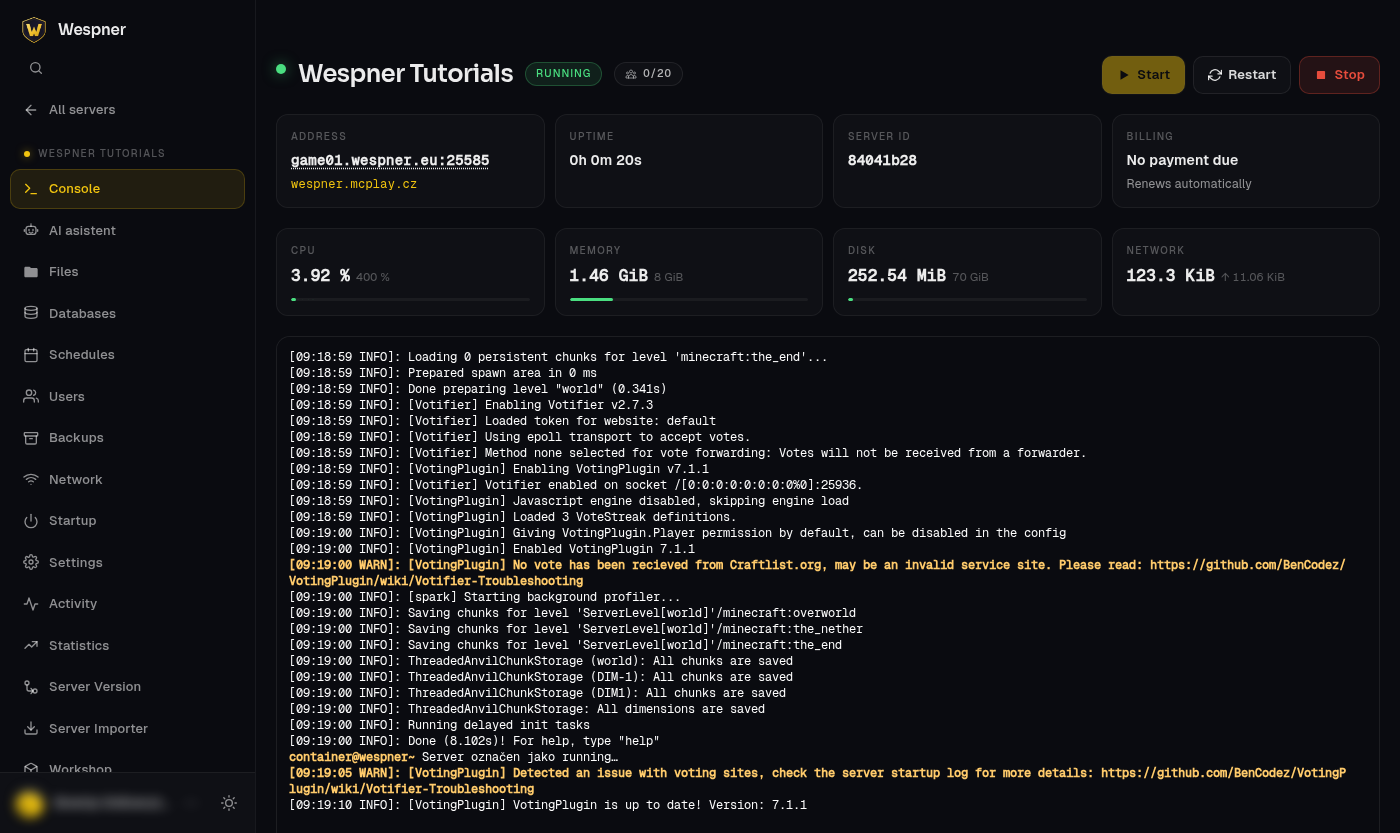
You save changes with the yellow “Save changes” button in the bottom right. Then restart the server again – the port change takes effect only after a restart. The console should now show the line [Votifier] Votifier enabled on socket /[0:0:0:0:0:0:0:0%0]:25936. If you see an Address already in use error instead, the port is already used by something else and you need to pick a different allocation.
This is the console of our server a moment after the restart – the server is running, CPU load has dropped to a few percent and NuVotifier reports port 25936. The orange VotingPlugin warnings about Craftlist.org appear only after step 5, once you have added the server list and no vote has come from it yet; they are not an error.
Token or public key?
NuVotifier can verify a vote in two ways, and server lists differ in which one they support:
- Token (the newer protocol v2) – a short string from the
tokens: default:entry inconfig.yml. Use the token wherever possible; it is more secure. - Public key (the older protocol v1) – a long string in the
plugins/Votifier/rsa/public.keyfile. Open it in the editor and copy the whole content, from beginning to end, without any extra spaces.
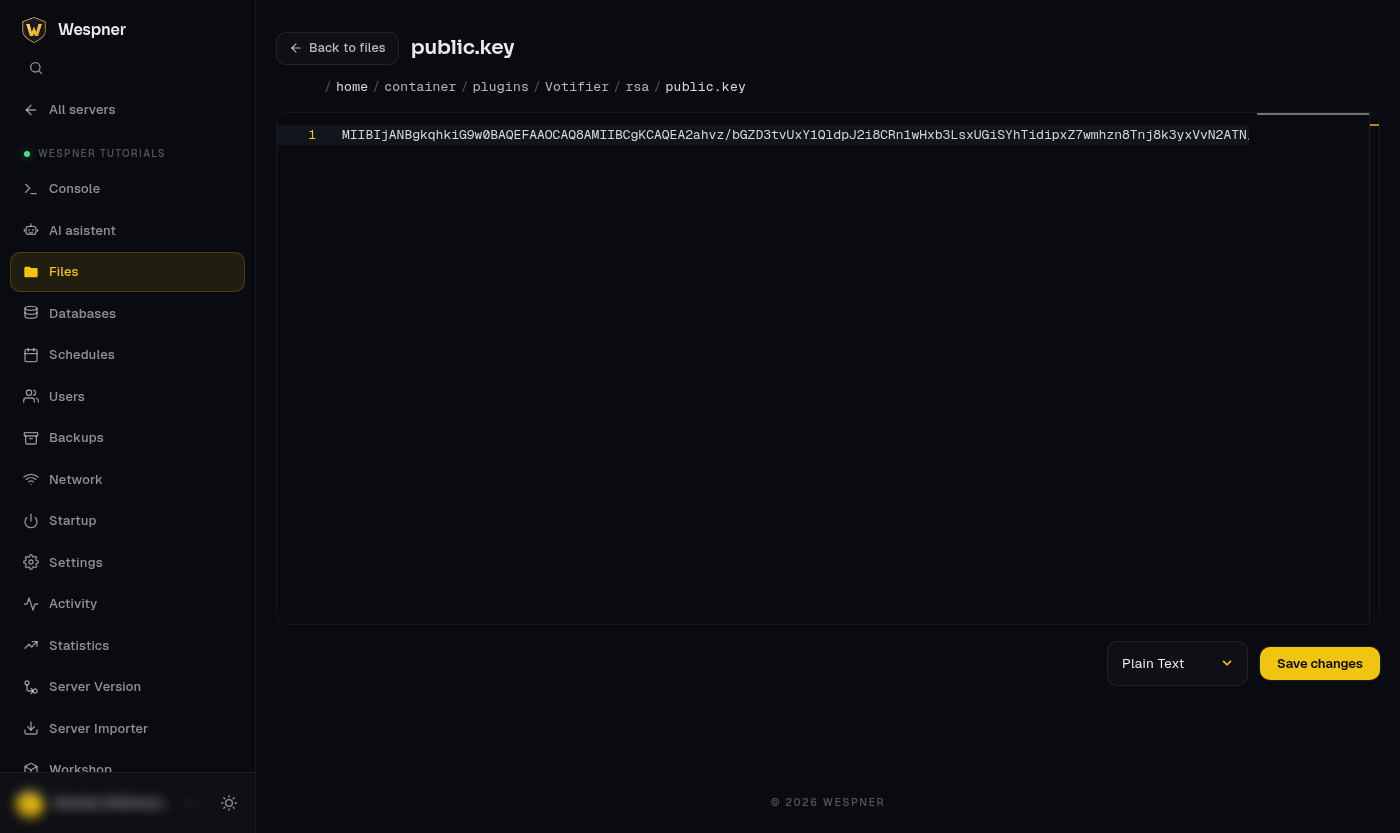
The key is a single long line. Click into the text in the editor, select everything with Ctrl+A and copy it with Ctrl+C.
The same folder also contains the private.key file. Never send it to anyone or paste it anywhere – whoever has it can send fake votes to your server.
Quick test from the console
Before connecting the server lists, check that the two plugins work together. On the “Console” page, type testvote PlayerName into the command line below the output (commands in the panel console are typed without a slash) and press Enter. NuVotifier creates a test vote and passes it to VotingPlugin:
[Votifier] Got a test vote record from localhost.test -> Vote (from:TestVote username:WespnerTutorial address:127.0.0.1 ...)
[VotingPlugin] Received a vote from service site 'TestVote' by player 'WespnerTutorial'!
[VotingPlugin] VoteSite TestVote does not exist with the servicesite 'TestVote', creating one, set AutoCreateVoteSites to false to prevent this
[VotingPlugin] Player WespnerTutorial has not joined before, disregarding vote. Reason: unknown-user. Set AllowUnjoined to true to accept.
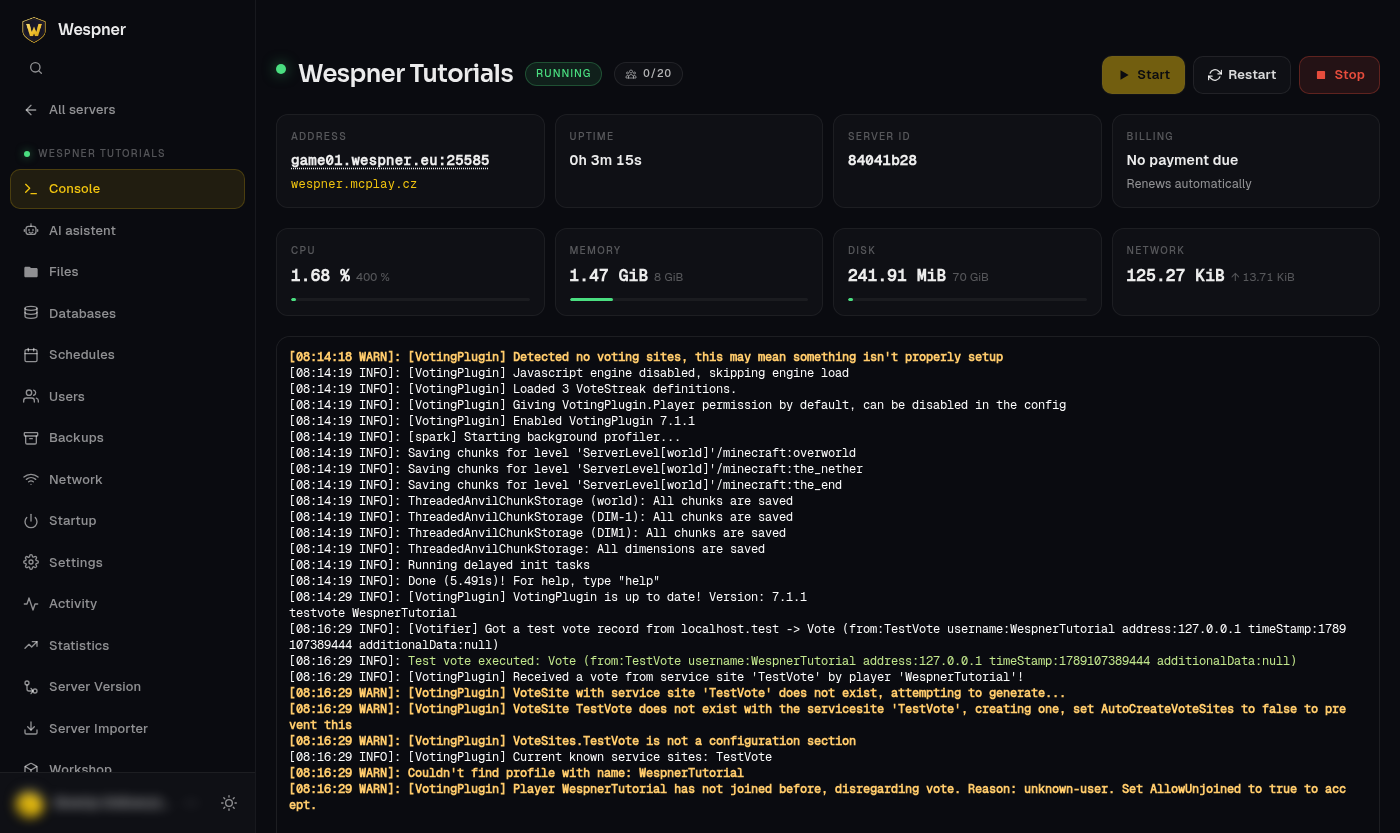
The last line matters: VotingPlugin only rewards players who have joined the server at least once. For the test, use the name of a player who has been on the server. You can also see that VotingPlugin automatically created an entry for the unknown server list (TestVote) – it does the same for real server lists.
4. Connecting the server lists
The procedure is similar on every server list: in the administration of your server you find the Votifier section, fill in the server address, the Votifier port and the token or public key, save the settings and send a test vote. In our example we enter the address wespner.mcplay.cz, port 25936 and the token or key from step 3. We will show it on the three most used Czech and Slovak server lists.
Czech-Craft.eu
- Log in to czech-craft.eu and click “Přidat další” (Add another) under “Moje servery” in the left menu. If you already have a server on Czech-Craft, open its settings – the fields are the same.
- Fill in the server details: name, website address and optionally a banner, description, YouTube ID and tags.
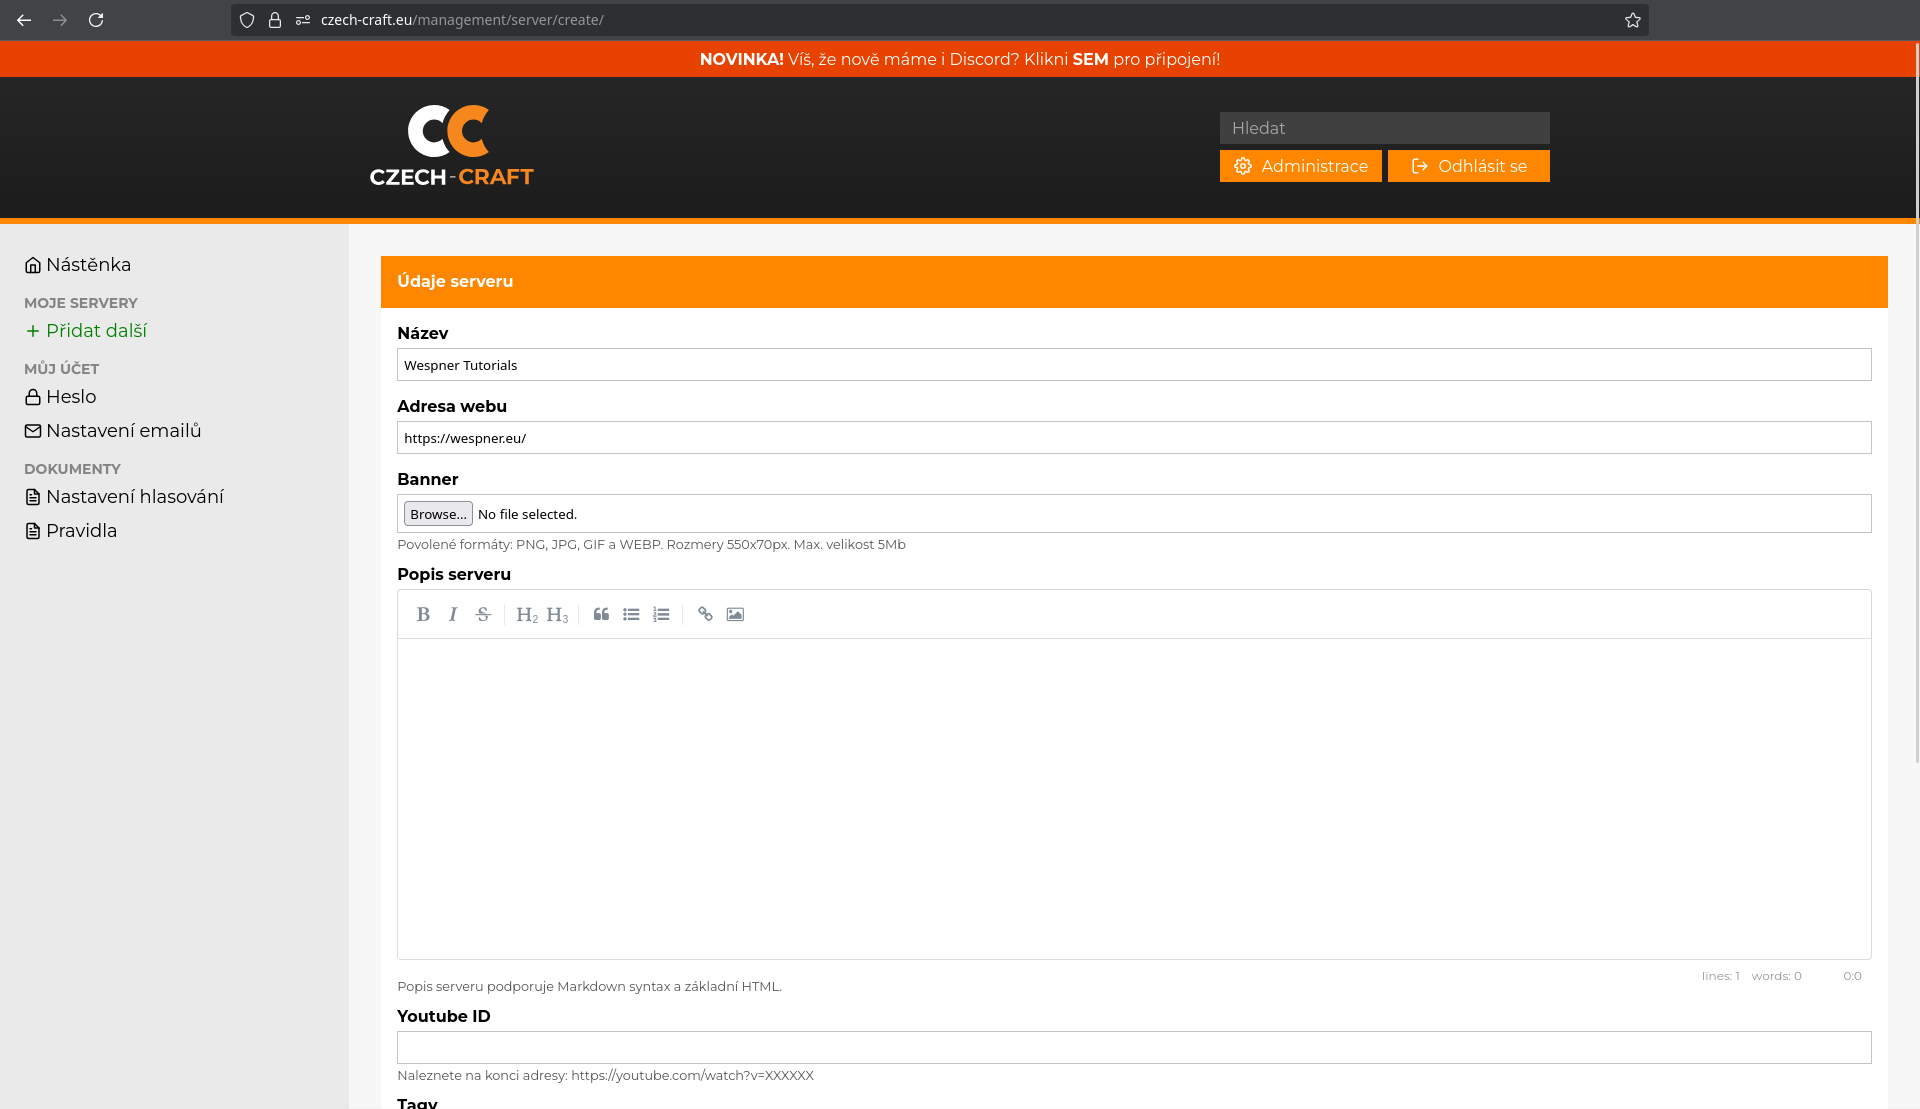
- In the “Adresa serveru” (server address) field, enter the address players use – in our case
wespner.mcplay.cz. If players connect with a port, enter it asaddress:port. - In the “Adresa votifieru” (Votifier address) field, enter the server hostname from the “Address” card in the Game panel and the Votifier port – in our case
game01.wespner.eu:25936. - In the “Token votifieru” (Votifier token) field, paste the token from
config.yml. Czech-Craft uses the newer token verification, so you do not need the public key here. - Click “Uložit” (Save). Then open your server's page on Czech-Craft and try voting for it – the vote must appear in the console.
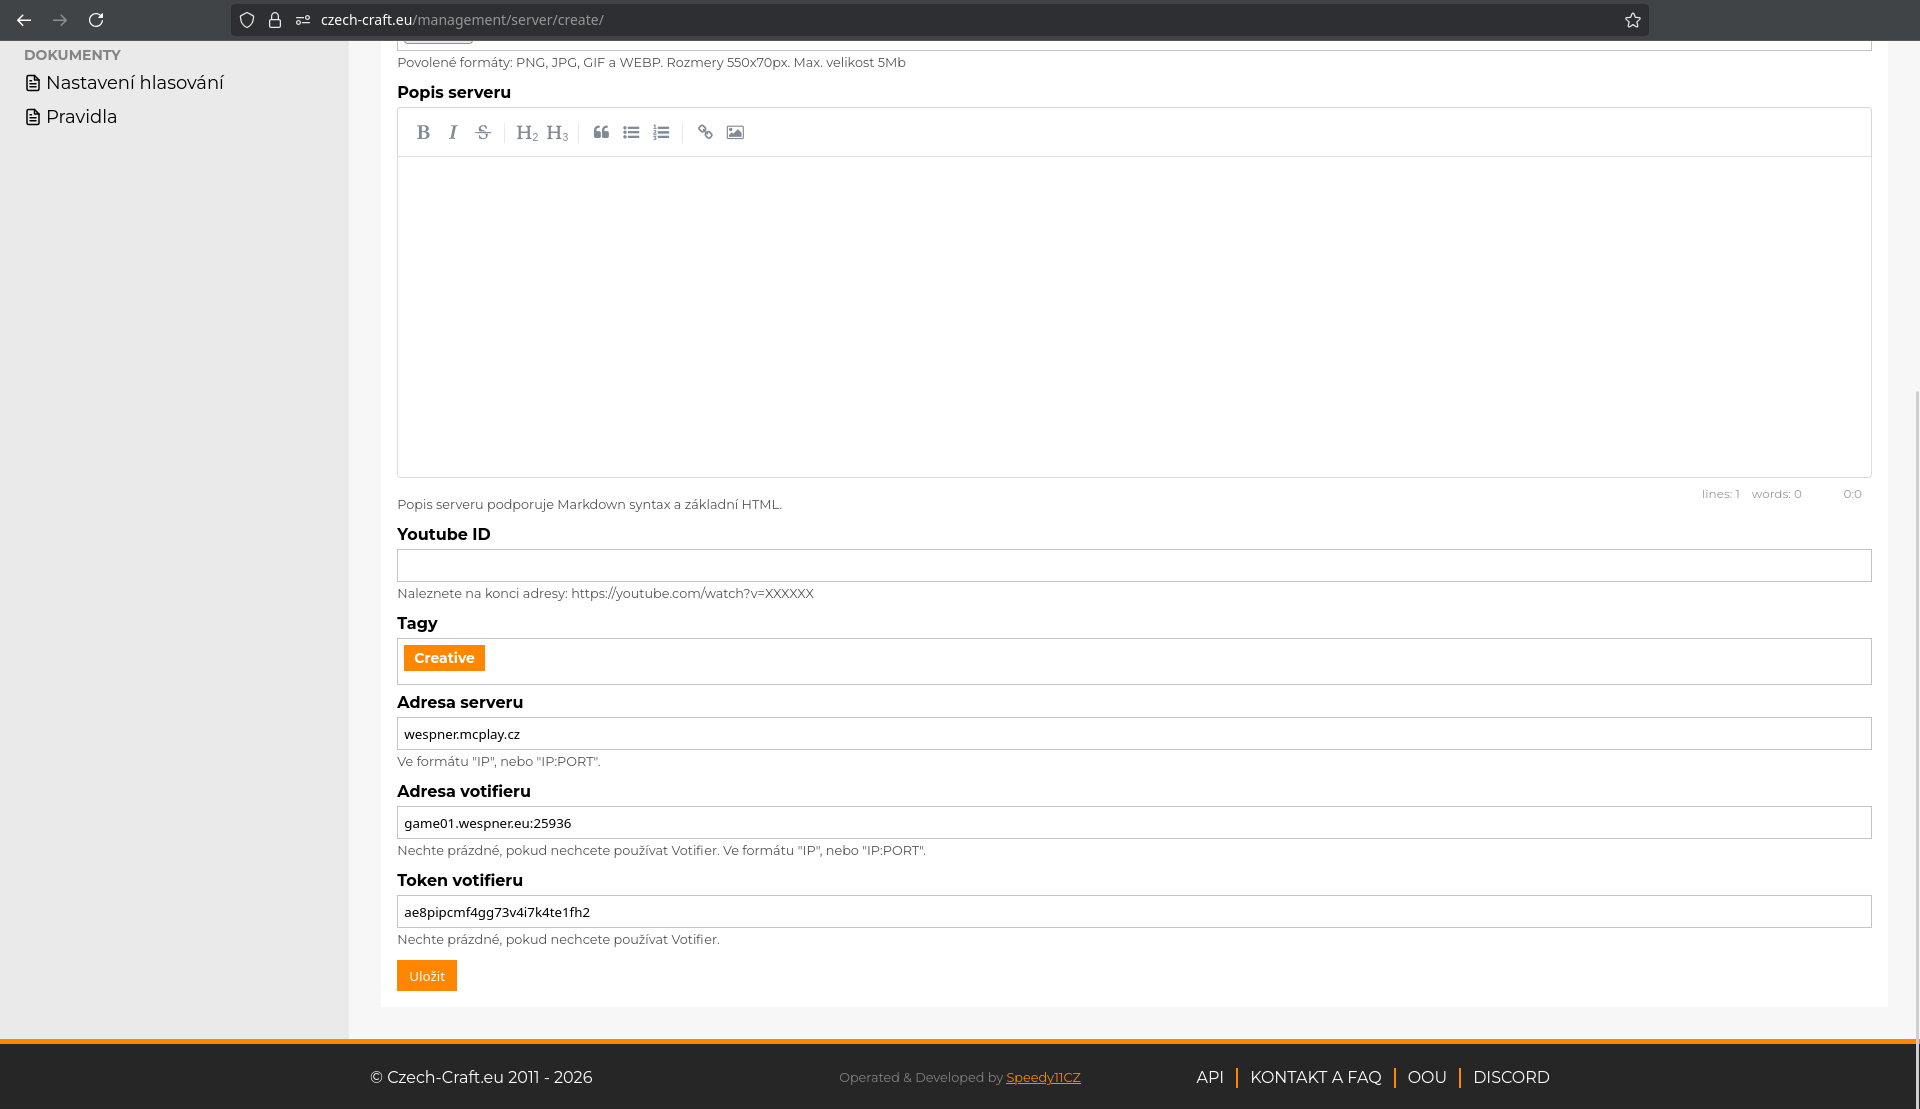
Craftlist.org
- Log in to craftlist.org and click “Přidat server” (Add server). In the step “1. Základní informace” (Basic information) fill in the server name, custom URL, the server address in the “IP adresa” field (in our case
wespner.mcplay.cz), country, description and tags. Click “Přidat server”.
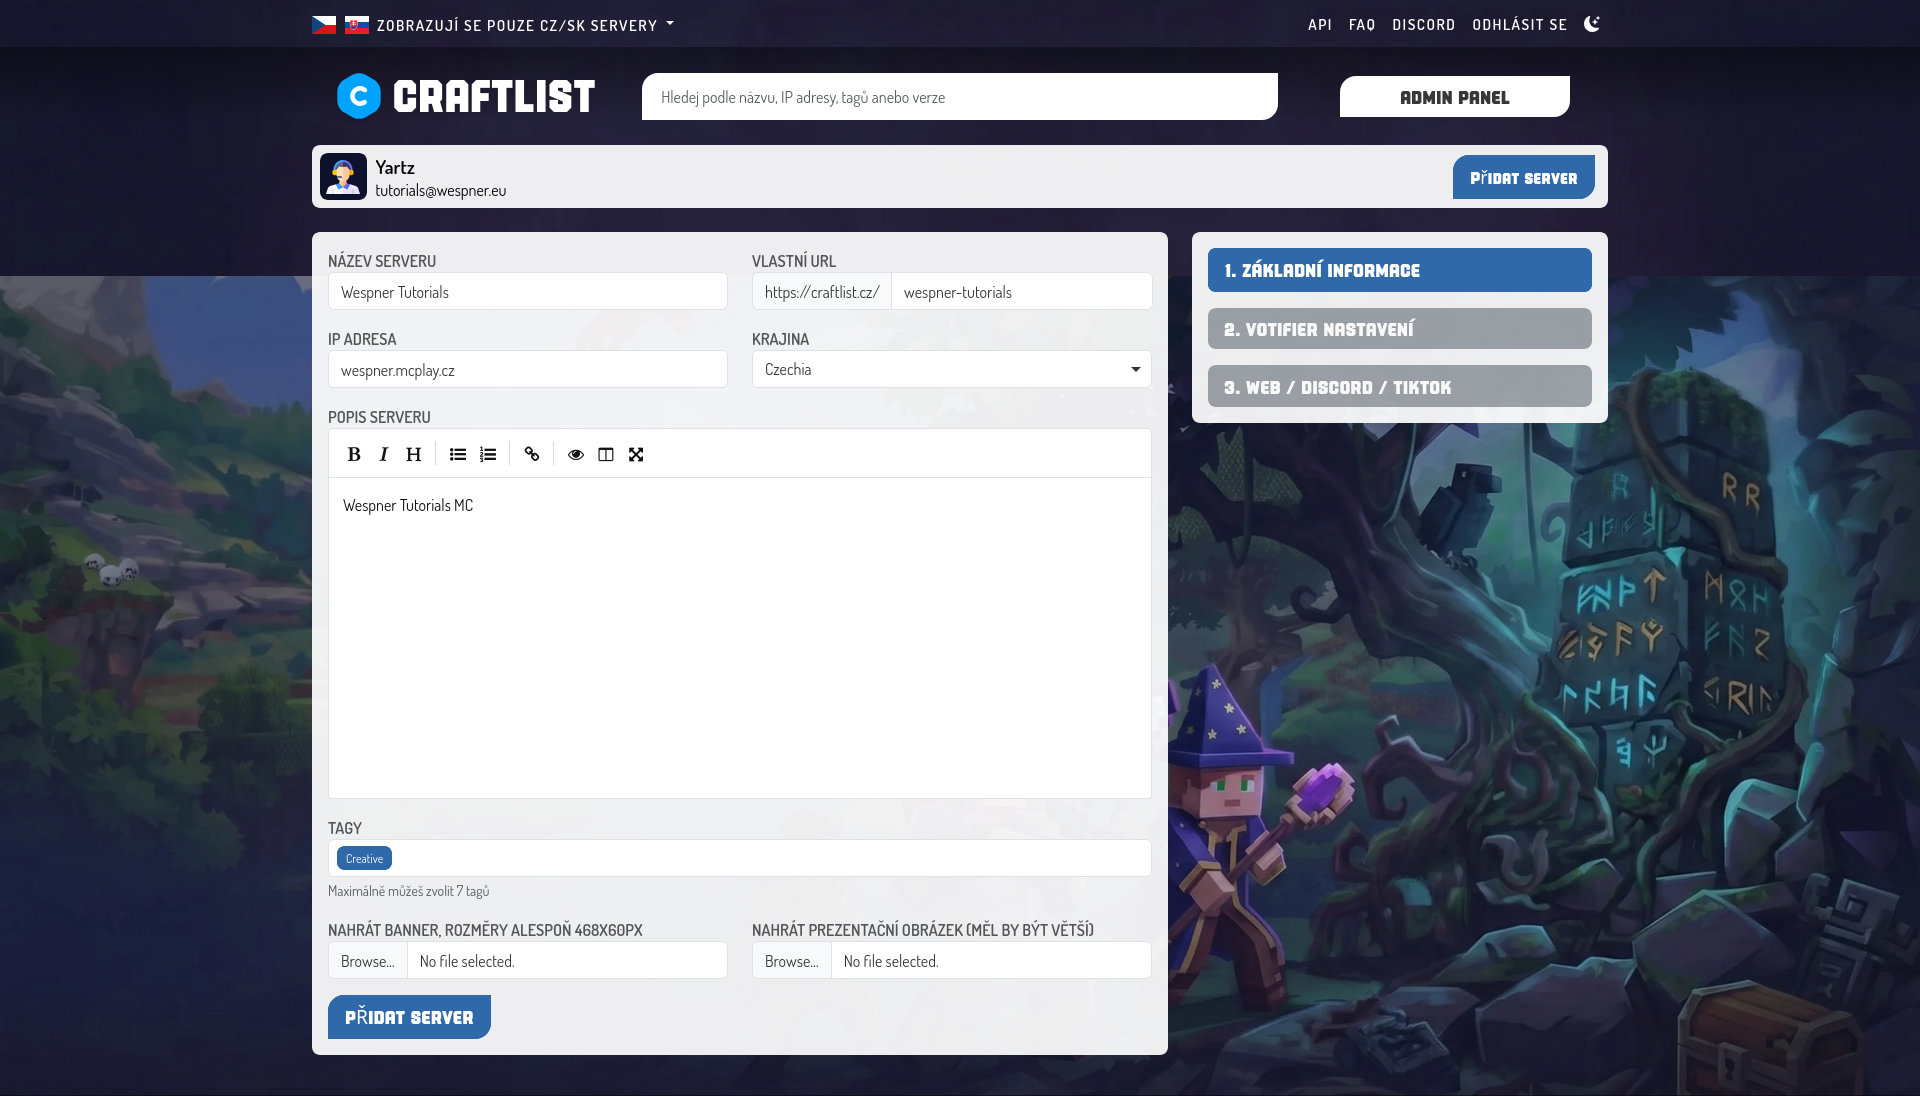
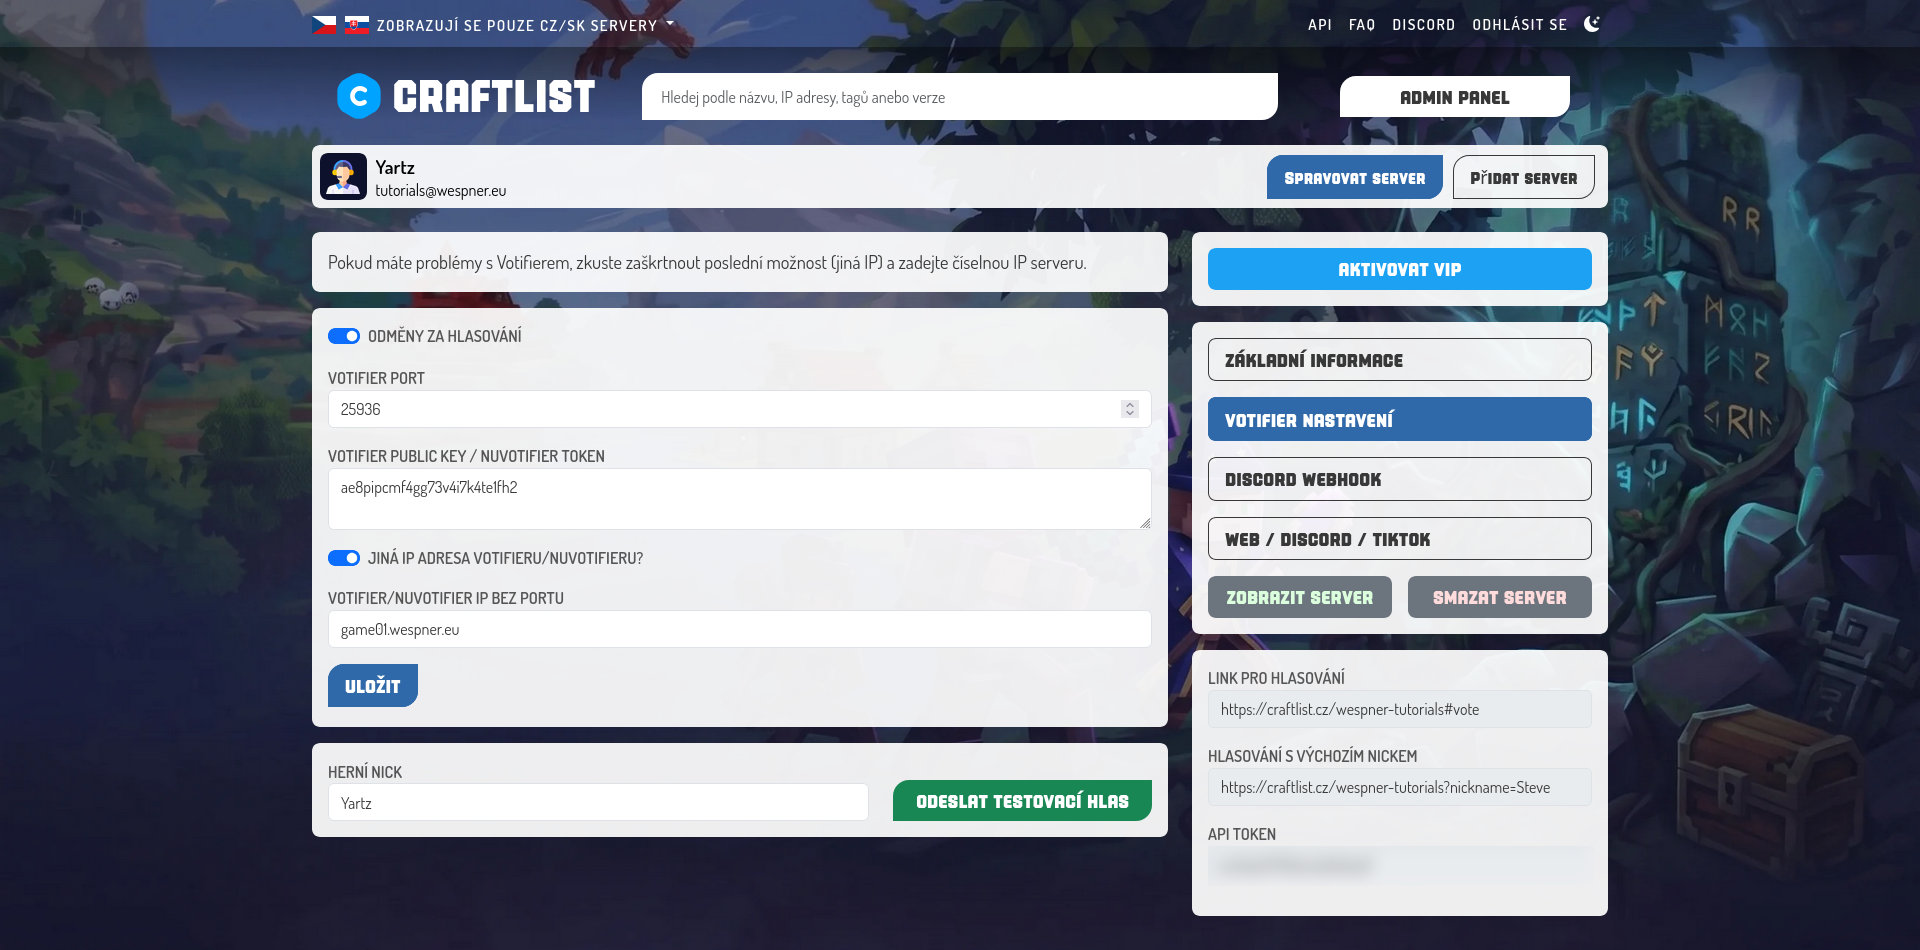
- After adding, click “Spravovat server” (Manage server) and choose “Votifier nastavení” (Votifier settings) in the right menu.
- Turn on the “Odměny za hlasování” (Rewards for voting) switch, enter the port in the “Votifier port” field (in our case
25936) and paste the token fromconfig.ymlinto the “Votifier public key / NuVotifier token” field. - Because players connect through the subdomain, also turn on “Jiná IP adresa votifieru/nuvotifieru?” (Different Votifier IP address?) and enter the hostname from the “Address” card in the Game panel into the “Votifier/NuVotifier IP bez portu” (IP without port) field – in our case
game01.wespner.eu. Click “Uložit” (Save). - Below the settings, enter your in-game nickname and click “Odeslat testovací hlas” (Send test vote). The vote must appear in the server console. On the right you will also find “Link pro hlasování” (voting link), which you will later use as
VoteURLin VotingPlugin.
MinecraftServery.eu
- Log in to minecraftservery.eu and choose “Přidat server” (Add server). In the first step, enter the server address (in our case
wespner.mcplay.cz) and click “Navázat spojení” (Connect) – the site checks that the server is running.
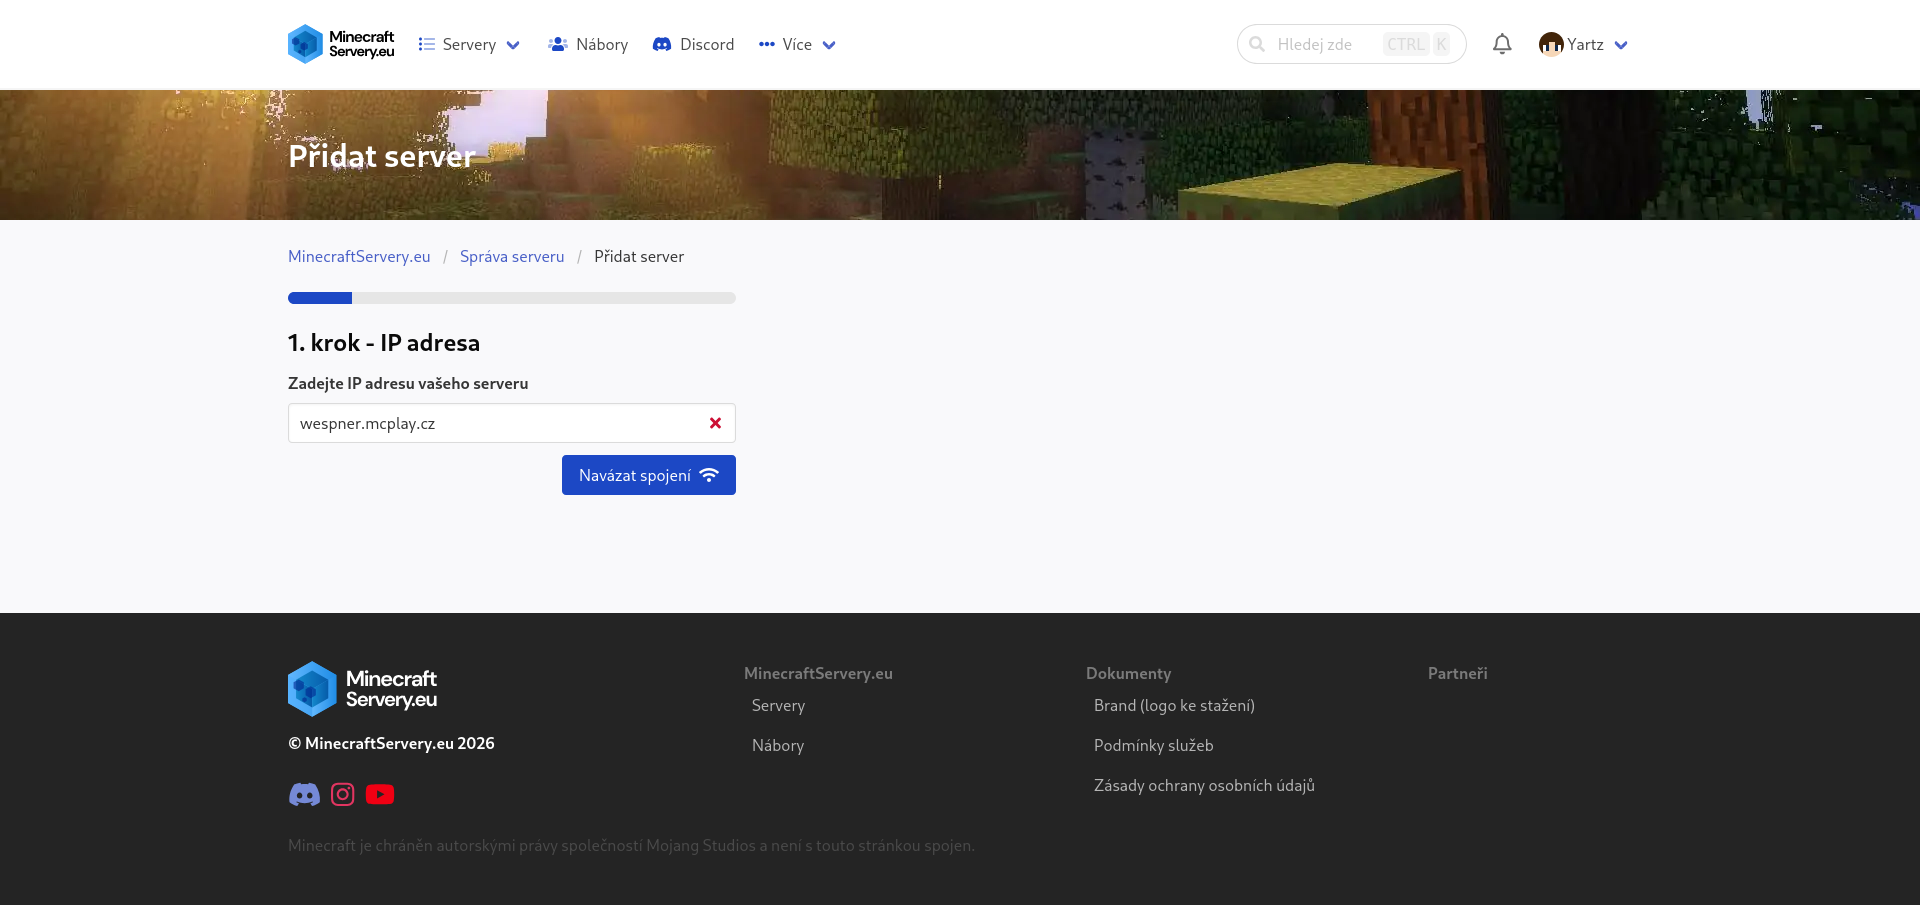
- Go through the remaining steps of the wizard: name and subtitle, website, social networks and YouTube (can be skipped), server description (at least 50 characters) and consent to the terms. Finally click “Přidat server”.
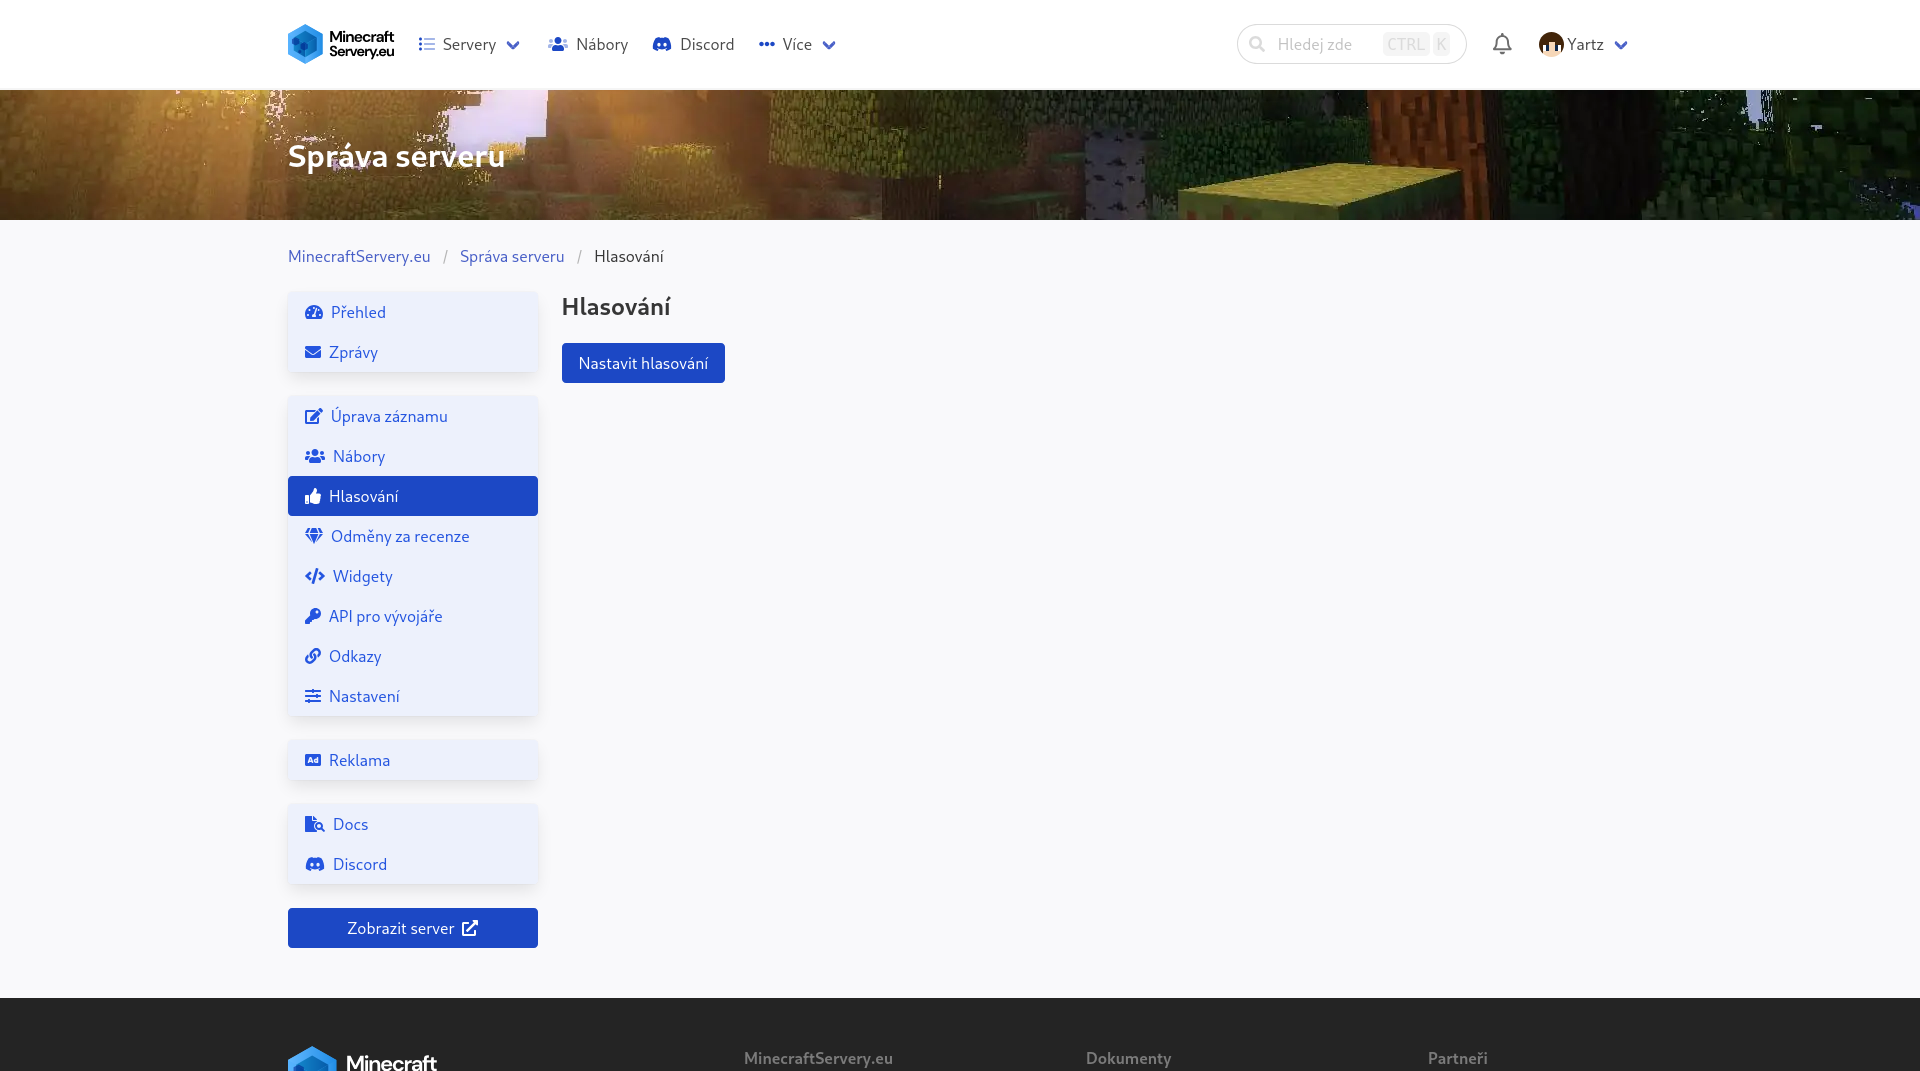
- Open “Správa serveru” (Server management), choose “Hlasování” (Voting) in the left menu and click “Nastavit hlasování” (Set up voting).
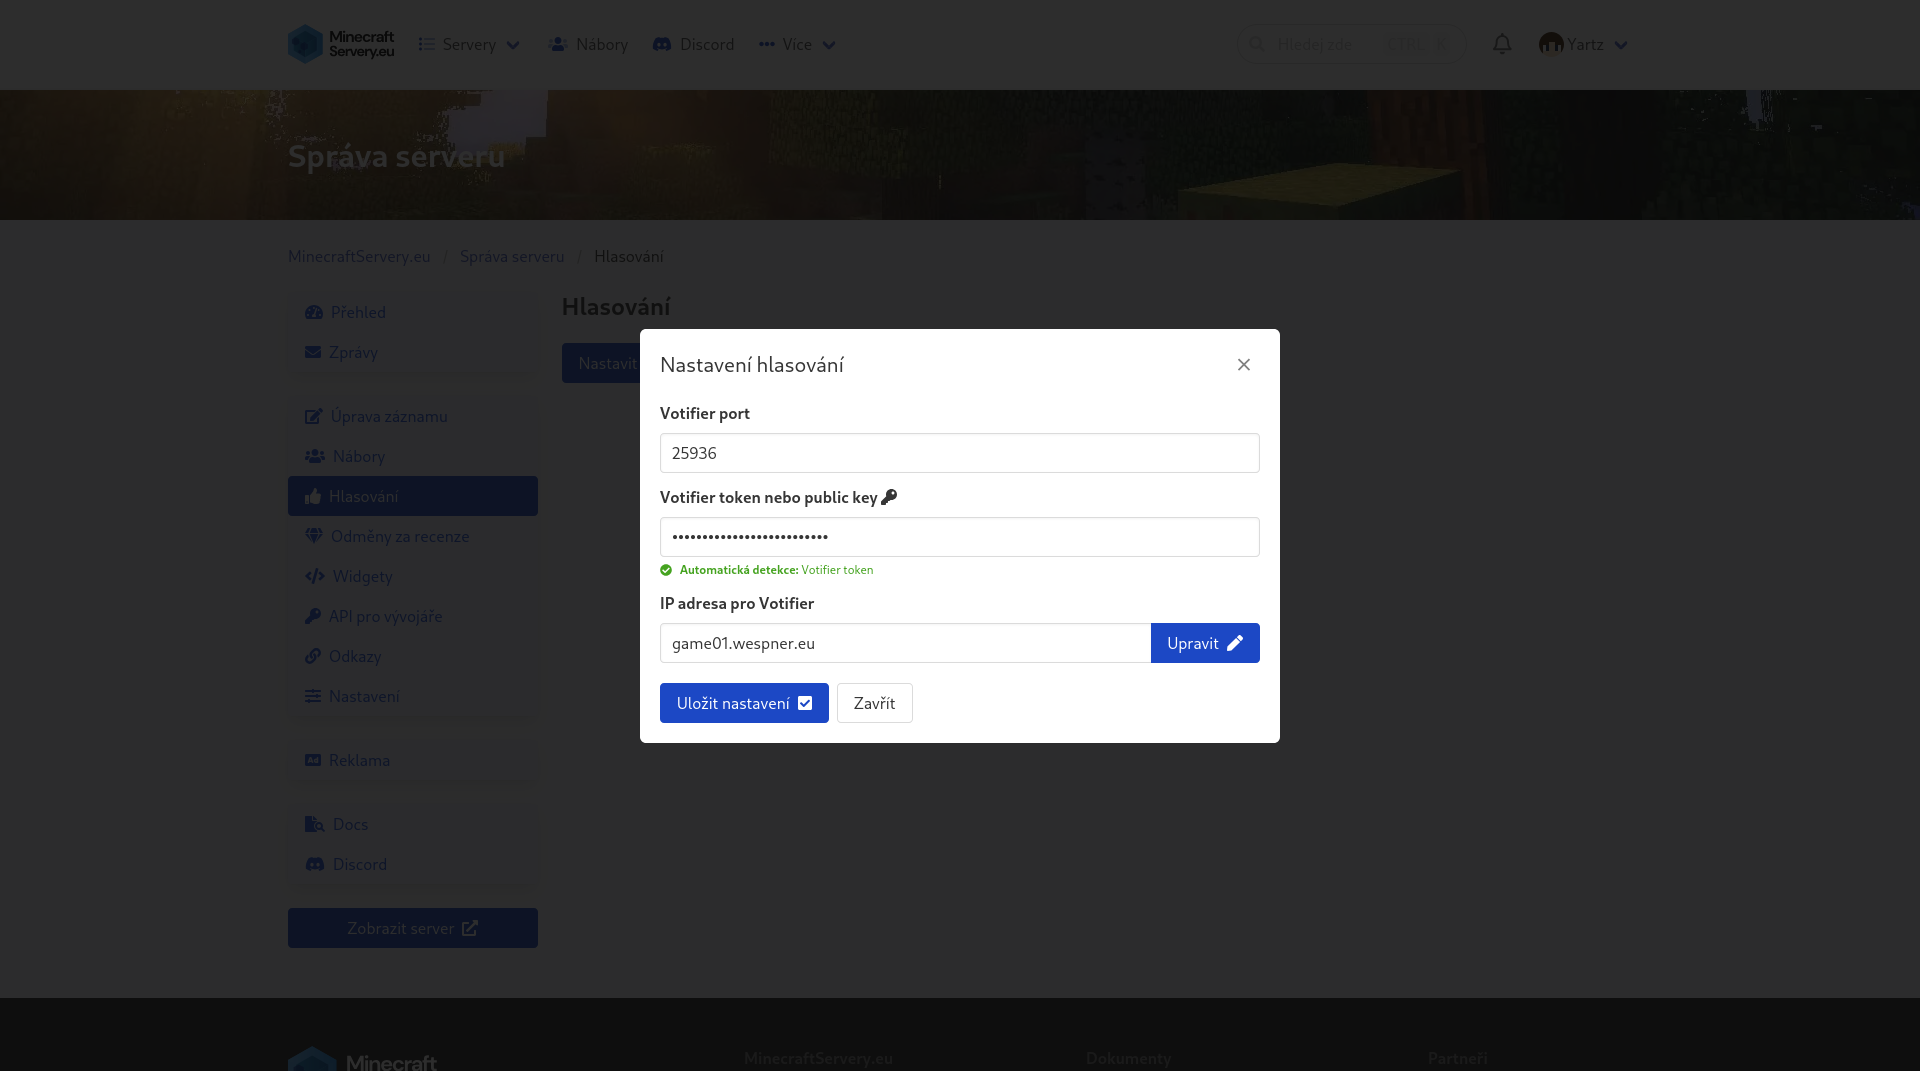
- In the dialog, fill in “Votifier port” (in our case
25936) and paste the token into the “Votifier token nebo public key” field – the site detects on its own that it is a token. Enter the hostname from the “Address” card into the “IP adresa pro Votifier” (IP address for Votifier) field (in our casegame01.wespner.eu) and click “Uložit nastavení” (Save settings). - Then try voting for your server and check the console.
Checking the console
After every test vote, look at the “Console” tab. NuVotifier prints a received vote roughly like this:
[Votifier] Got a protocol v2 vote record from /203.0.113.10:51234 -> Vote (from:Craftlist.org username:YourName address:... timestamp:...)
The from: value is the name the server list identifies itself with – you will need it when setting up rewards. If the line does not appear, continue with the Troubleshooting section at the end of this guide.
5. Setting up rewards (VotingPlugin)
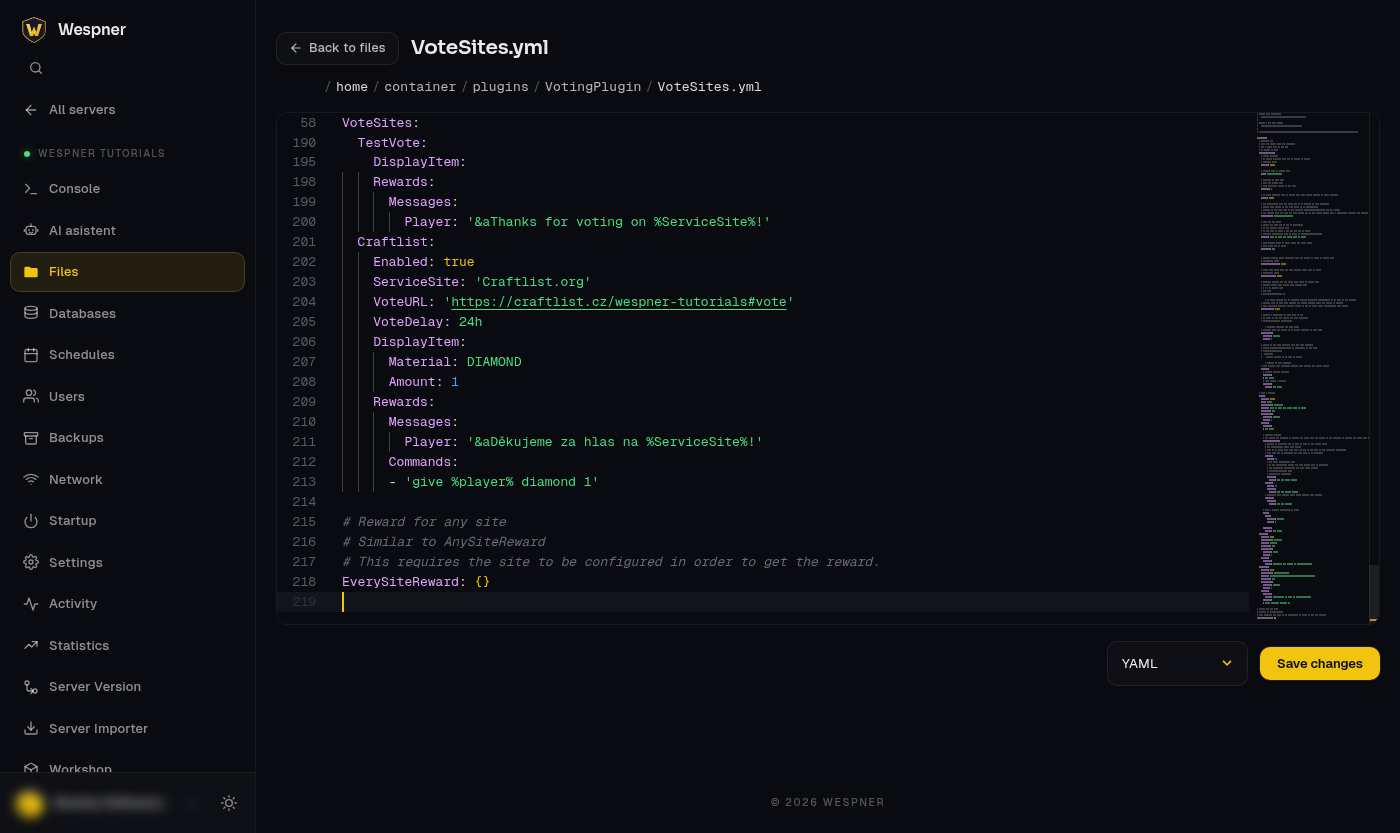
On the first vote from each server list, VotingPlugin automatically creates an entry in the plugins/VotingPlugin/VoteSites.yml file. Open it in the editor (Files → plugins/VotingPlugin folder). The file starts with a long comment and two disabled examples (ExampleVoteSite and Site2), which you can leave alone. Entries for your server lists belong under the VoteSites: key with the same indentation as the examples – the easiest way is to add them at the end of the file, before the EverySiteReward line. This is the entry for Craftlist.org that we added on our tutorial server:
  Craftlist:
    Enabled: true
    ServiceSite: 'Craftlist.org'
    VoteURL: 'https://craftlist.cz/wespner-tutorials#vote'
    VoteDelay: 24h
    DisplayItem:
      Material: DIAMOND
      Amount: 1
    Rewards:
      Messages:
        Player: '&aThank you for voting on %ServiceSite%!'
      Commands:
      - 'give %player% diamond 1'
Craftlist– the name of the entry; you can name it as you like (no spaces or special characters).ServiceSite– must exactly match the name from the console (thefrom:value). This is how VotingPlugin recognises which list the vote came from.VoteURL– the link to your server's page on that list. Players see it after typing the/votecommand.VoteDelay– how long until a player can vote again (24hon most lists).DisplayItem– the icon of the list in the/votemenu. Keep it, the plugin requires it for every entry.Rewards– what the player receives. InCommandsyou can write any server commands;%player%is replaced with the player's name. To give in-game money, add aMoney: 100line underRewards(requires the Vault plugin and an economy plugin such as EssentialsX).
The end of the file on our server after adding the entry (above it is the TestVote entry the plugin created during the quick test; you can delete it):
After editing, save the file and load it with the av reload command in the console. You can also test the reward without a server list using av vote PlayerName Craftlist (the last word is the entry name in VoteSites.yml). A player who is currently online should receive the reward immediately.
Troubleshooting
- The test vote does not appear in the console. Check that the port in
config.yml, the port on the server list and the port in the “Network” tab are the same number, thathostis0.0.0.0, and that you restarted the server after editing the configuration. Also go through the console output from the server start – NuVotifier reports there whether it managed to open the port. - The console shows
Could not decrypt data (is your key correct?). The server list has a different public key than your server. Openrsa/public.keyagain, copy the whole content and paste it on the server list once more. - The console shows
Address already in use. The chosen port is already used by another service or plugin. Create another allocation in the “Network” tab and use that one. - The vote arrived, but the player got no reward. Check that VotingPlugin is running (no error at startup in the console) and that
ServiceSiteinVoteSites.ymlexactly matches thefrom:value from the console, including upper and lower case. If the console sayshas not joined before, disregarding vote, the vote was for a player who has never joined the server – VotingPlugin ignores such votes on purpose. - Nothing works after a configuration change. Do not use the
/reloadcommand; NuVotifier does not support it. Load the configuration withnvreloadin the console or restart the server.
If you are still stuck, open a ticket – include the server name, the port you used and the console output.